Post by Steve King (Admin) on Aug 9, 2012 12:46:15 GMT -6
HOW TO MAKE THE BEST CORNHOLE BAGS
Making your own corn bags for the great game of cornhole is easy, fun and can save you a ton of cash replacing busted bags. Cornhole bags are not made to last forever but we have a few trade secrets to share with you, ensuring that you get the most life and perfect play out of your bags. Our cornhole bag design has been thoroughly tested against other designs and have been proven to resist breakage. It all has to do with physics. The stitching combination, the fabric and the amount of fill is crucial to making a quality, long lasting bag. The finished bags in this tutorial will be to ACA (American Cornhole Association) Regulation size: 6" x 6" Final Weight: 1lb with rounded corners.
What you'll need:
•Sewing Machine: Any sewing machine capable of Straight and Zig-Zag Stitch for best results.
•Needle Size: #16 machine needle - Suggested needle size for 10oz canvas•Thread: Polyester coated Polyester Thread. We use Coats & Clark (Dual Duty)
•Duck Cloth: 10 oz. duck cloth is the most commonly used in sewing cornhole bags for its durability, color availability and it's properties, by allowing the corn dust to come through the bag and aiding the slide of the bag to the hole. Some people claim to use 12 oz. duck but it is not possible to find it dyed in many colors. Usually only natural or black. 10 oz. dyed duck cloth comes in 60" width. 1 yard will make 16 complete bags in this tutorial. A set of bags for cornhole consists of 8 bags, 4 bags of the same color for each player. You can buy our Big Duck Canvas brand duck cloth at up to 60% off retail prices here: Big Duck Canvas - Duck Cloth Wholesale By The Yard
•Cornhole Bag Fill: Traditionally, cleaned whole corn is used. You can buy this in 40-50lb bags at your local feed or tractor supply store. We are making weather resistant bags in this tutorial using recycled plastic resin pellets. Resin filled will last much, much longer. They resist water, mold, bugs and animals from destroying the integrity of the bags. It is very difficult to find the appropriate size & density of plastic pellets for best use in cornhole bags. We have updated the best resin specs. here: tossinggames.com/thread/2984/detailed-specific-resin-bag-specifications
•Piece of cardboard: You will be cutting out a usable tracing template from the printable (PDF) template.
•Printer: for printing the template
•Cornhole Bag Template: cornhole_bag_template1.pdf (769.77 KB)DOWNLOAD TEMPLATE HERE[/a] (PDF)
•Marker: Any fabric marker or permanent marker will do.
•Rotary Cutter: Great for straight cuts and multiple layers of fabric.
•Self Healing Mat & Cutting Guide
•Scissors
•Masking Tape
•Digital Scale: for weighing fill with accuracy
•Funnel: for loading the bags with fill
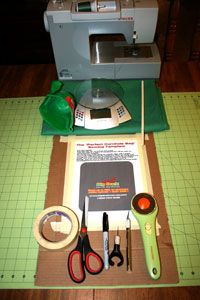
OK, Now that you have all of your materials let's get started!
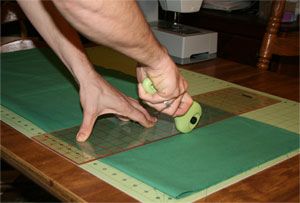
First, Cut your fabric in 7.5 " squares on your self healing mat using your rotary cutter and cutting guide. You can cut multiple layers with a good cutter to save time.
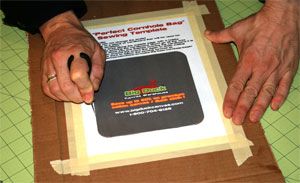
Next, print and tape the cornhole_bag_template1.pdf (769.77 KB) cornhole bag template[/a] to a piece of corrugated cardboard using your masking tape. DO NOT change the print size settings from your printer options!
Now, begin cutting out the bag template using your razor knife. You don't have to go all the way through the cardboard at this point. Once you have cut out the tracing template and scored the cardboard it will be much easier to cut all the way through while keeping the lines straight.
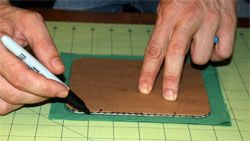
Once you have the template cut out, line up two of your 7.5" duck cloth squares together. Place the cardboard template in the center. You should have about 1/2" of fabric left each side of the template. This allows for ample fabric on the inside of your seams to help reduce breakage. At this point you should also mark where your opening will be. You will want to make it big enough to make turning the bags inside out easy as well as allowing for quick filling. For this tutorial we marked our opening at 1.75" from each side.
Now we are ready for sewing...
We will be double stitching these with 2 different stitch settings for maximum strength.
First, set your machine with a straight stitch at a medium length. Begin sewing on your template mark. Start at one end of the hole openings. Be sure to do a back-stitch at the beginning and end of your stitch.
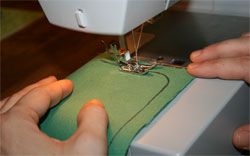
Next we are going to use a Zig-Zag stitch on the outside of our straight stitch. Try to keep from overlapping the other stitch to maintain the proper shape of the bag. This stitch is what gives the bag its resilience to impact and reduces breakage because it actually flexes with the fabric. You may have to play with your tension settings some to get it just right.

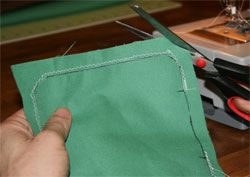
Now Trim Your Corners for easier turning and corner forming.
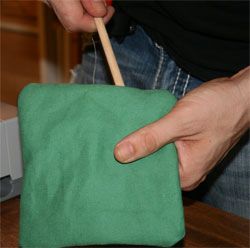
Turn your bag inside out from the opening you left and use a wooden stick or similar tool to poke out the corners.
Now it's time to weigh your fill. We are using plastic resin fill for weatherproof bags. It's weight and density is very similar to corn. Whatever fill you choose, you will need 15 to 15.4 oz. for these bags. Approx. 2 1/4 cups for resin and 2 cups for corn. DO NOT overfill your bags! There is a higher likelihood of failure on impact when overfilled. The fabric will account for about .6 ounces and the end bag result will be about 1 3/8" thick and weigh between 15.6 and 16 oz. If your bag comes out over 1 1/2" thick when pressed and laid flat, then it is too plump!

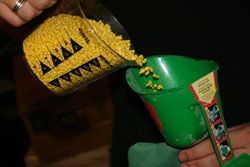
Use a funnel to load your bags with fill.
Now zip up the opening with a zig-zag stitch. Here, we've back-stitched over the entire stitch for added strength. You can stitch over the entire length if you wish or just overlapping the initial inside seam. Either way, you now have a super tough cornhole bag that will outlast all others.
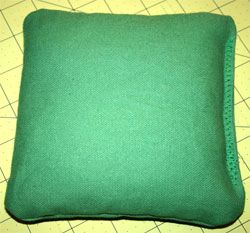
Enjoy!
Source: Big Duck Canvas and STLCornhole.com
Making your own corn bags for the great game of cornhole is easy, fun and can save you a ton of cash replacing busted bags. Cornhole bags are not made to last forever but we have a few trade secrets to share with you, ensuring that you get the most life and perfect play out of your bags. Our cornhole bag design has been thoroughly tested against other designs and have been proven to resist breakage. It all has to do with physics. The stitching combination, the fabric and the amount of fill is crucial to making a quality, long lasting bag. The finished bags in this tutorial will be to ACA (American Cornhole Association) Regulation size: 6" x 6" Final Weight: 1lb with rounded corners.
What you'll need:
•Sewing Machine: Any sewing machine capable of Straight and Zig-Zag Stitch for best results.
•Needle Size: #16 machine needle - Suggested needle size for 10oz canvas•Thread: Polyester coated Polyester Thread. We use Coats & Clark (Dual Duty)
•Duck Cloth: 10 oz. duck cloth is the most commonly used in sewing cornhole bags for its durability, color availability and it's properties, by allowing the corn dust to come through the bag and aiding the slide of the bag to the hole. Some people claim to use 12 oz. duck but it is not possible to find it dyed in many colors. Usually only natural or black. 10 oz. dyed duck cloth comes in 60" width. 1 yard will make 16 complete bags in this tutorial. A set of bags for cornhole consists of 8 bags, 4 bags of the same color for each player. You can buy our Big Duck Canvas brand duck cloth at up to 60% off retail prices here: Big Duck Canvas - Duck Cloth Wholesale By The Yard
•Cornhole Bag Fill: Traditionally, cleaned whole corn is used. You can buy this in 40-50lb bags at your local feed or tractor supply store. We are making weather resistant bags in this tutorial using recycled plastic resin pellets. Resin filled will last much, much longer. They resist water, mold, bugs and animals from destroying the integrity of the bags. It is very difficult to find the appropriate size & density of plastic pellets for best use in cornhole bags. We have updated the best resin specs. here: tossinggames.com/thread/2984/detailed-specific-resin-bag-specifications
•Piece of cardboard: You will be cutting out a usable tracing template from the printable (PDF) template.
•Printer: for printing the template
•Cornhole Bag Template: cornhole_bag_template1.pdf (769.77 KB)DOWNLOAD TEMPLATE HERE[/a] (PDF)
•Marker: Any fabric marker or permanent marker will do.
•Rotary Cutter: Great for straight cuts and multiple layers of fabric.
•Self Healing Mat & Cutting Guide
•Scissors
•Masking Tape
•Digital Scale: for weighing fill with accuracy
•Funnel: for loading the bags with fill

OK, Now that you have all of your materials let's get started!
First, Cut your fabric in 7.5 " squares on your self healing mat using your rotary cutter and cutting guide. You can cut multiple layers with a good cutter to save time.

Next, print and tape the cornhole_bag_template1.pdf (769.77 KB) cornhole bag template[/a] to a piece of corrugated cardboard using your masking tape. DO NOT change the print size settings from your printer options!
Now, begin cutting out the bag template using your razor knife. You don't have to go all the way through the cardboard at this point. Once you have cut out the tracing template and scored the cardboard it will be much easier to cut all the way through while keeping the lines straight.

Once you have the template cut out, line up two of your 7.5" duck cloth squares together. Place the cardboard template in the center. You should have about 1/2" of fabric left each side of the template. This allows for ample fabric on the inside of your seams to help reduce breakage. At this point you should also mark where your opening will be. You will want to make it big enough to make turning the bags inside out easy as well as allowing for quick filling. For this tutorial we marked our opening at 1.75" from each side.

Now we are ready for sewing...
We will be double stitching these with 2 different stitch settings for maximum strength.
First, set your machine with a straight stitch at a medium length. Begin sewing on your template mark. Start at one end of the hole openings. Be sure to do a back-stitch at the beginning and end of your stitch.

Next we are going to use a Zig-Zag stitch on the outside of our straight stitch. Try to keep from overlapping the other stitch to maintain the proper shape of the bag. This stitch is what gives the bag its resilience to impact and reduces breakage because it actually flexes with the fabric. You may have to play with your tension settings some to get it just right.

Now Trim Your Corners for easier turning and corner forming.

Turn your bag inside out from the opening you left and use a wooden stick or similar tool to poke out the corners.

Now it's time to weigh your fill. We are using plastic resin fill for weatherproof bags. It's weight and density is very similar to corn. Whatever fill you choose, you will need 15 to 15.4 oz. for these bags. Approx. 2 1/4 cups for resin and 2 cups for corn. DO NOT overfill your bags! There is a higher likelihood of failure on impact when overfilled. The fabric will account for about .6 ounces and the end bag result will be about 1 3/8" thick and weigh between 15.6 and 16 oz. If your bag comes out over 1 1/2" thick when pressed and laid flat, then it is too plump!

Use a funnel to load your bags with fill.

Now zip up the opening with a zig-zag stitch. Here, we've back-stitched over the entire stitch for added strength. You can stitch over the entire length if you wish or just overlapping the initial inside seam. Either way, you now have a super tough cornhole bag that will outlast all others.

Enjoy!
Source: Big Duck Canvas and STLCornhole.com


